
Creating websites nowadays has become such a complicated matter, that it often takes an army of developers and a huge array of tools to tackle a professional web project. It is so stressful to hear of yet another new tool that you have to learn not to fall behind. Technologies come and go, frustration accumulates.
One of such topics I was afraid to touch was deployment. Sftp-ing to the server and editing things live from there seemed often the quickest way to fix something on a live project. But literally over a course of few months I’ve grasped some ideas I don’t know how I lived without. Here I want to share with you my deployment journey, step by step.
This tutorial will give you an overview of 3 key components of deploying TYPO3 Flow/Neos applications: code repository (Github) + deployment toolbox (Surf) + continuous delivery tool (CircleCI). We use hosted solutions here instead of things like Jenkins and GitLab because they are much easier to setup for beginners while still being free for open source projects.
Requirements:
- Some Git and Github knowledge
- Basic Composer understanding
- SSH access to deployment server and Linux/MacOS development PC
Step 1: Put code into git repositories and compile it with Composer
The first natural step after I started using TYPO3 Neos to build websites was to put all of my packages into git code repositories and pull them together via Composer PHP package manager. That’s how Neos itself works.
- Upload your site package and other custom packages to Github repository (private or public).
- Clone base Neos distribution and create your own distribution on top of it: add your Github repositories to repository list of composer.json file, and then require your packages. Example.
- Add your customized Neos distribution as a separate repository in Github. Here is mine.
Workflow:
- Edit the code in one of your repositories.
- Run
composer updatelocally, make sure things work, commit your new composer.lock file. - Run
composer installon production server
Advantages to how you worked before:
- All of your code now is safe and easily accessible in Github repositories
- Clear and conscious way to manage and assemble dependencies
Step 2: Deploy code with TYPO3 Surf
The previous step has got us far, now lets add some durability to our deployment solution.
Let’s install and configure Surf:
- Require
typo3/surfin your composer.json. Run composer update. - Create a deployment configuration file similar to this one. Make sure you can make a password-less login to your server via public key.
- Run
./flow surf:deploy DeploymentNameto run a deployment. On first run it would fail as it does not know how to connect to your database yet. - Add Settings.yaml with your DB config on your deployment server to
/path-to-surf/shared/Configuration/Production/Settings.yaml. Symlink your webroot toreleases/current. - Optionally configure smoke tests (see Surf docs).
Workflow:
- Edit the code in your repositories. Commit and push the changes to your packages.
- Run
composer updatelocally, make sure things work, commit and push your new composer.lock file. - Run Surf manually from command line
Advantages over previous step:
- Easy to roll-back to previous versions of deployment.
- Automatic smoke-test before going live.
Step 3: Continuous delivery with CircleCI
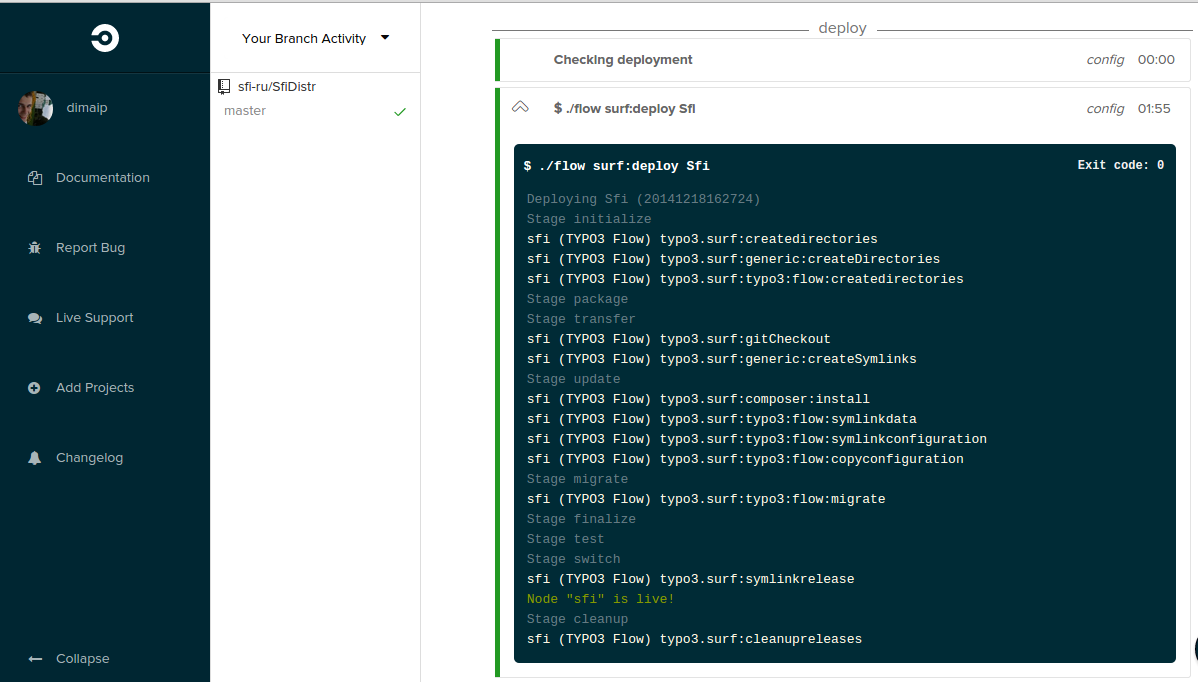
Now it’s a pleasure to see how Surf automatically deploys our Composer-based project, but we would like Surf to do it on every new commit to master branch of our repository. That’s easy to do with CircleCI:
- Register on circleci.com and create new project based on your project’s Github repository.
- Add a circle.yml file to the root of your project distribution, that describes deployment process.
- Add your ssh key to CircleCI
Now we got all we had on step two, but ran automatically on every code commit to master branch of your project repository.
Workflow:
- Edit the code in your repositories. Commit and push the changes to your packages.
- Run
composer updatelocally, make sure things work, commit and push your new composer.lock file.
Advantages over previous step:
- Deployment is triggered automatically on every commit to Github
- You can do some more advanced tests in CircleCI, in addition to smoke tests done by Surf
- Configure more advanced workflows with multiple stages and nodes
Where to go next
Of course what we have achieved is not rocket science and there are many ways to improve this setup. First of all you might like to add more stages to your project, like a staging environment. You might want to employ more advanced testing techniques to make sure you site really works the way it should before going live. Behavioural tests (Behat) come to my mind first, but I’m really open to other ideas on how to test Neos websites.
And finally there is a whole new world of Docker, but that is already a different story.
Special thanks go to Johannes Steu for teaching me 95% of things I write about here.